|
TABLE OF CONTENTS
1) Foreword
2) Loading floppy disk images into emulator
3) Saving floppy disk images to cassette files
4) Process History
5) Disc format, Encoding and Geometry
6) Useful links
7) Credits
1) FOREWORD
This page contains information and tutorials about reading and handling floppy
disks for Salora Manager, including ones containing errors. Although we never
had access to floppy disks for Laser 2001 and this tutorial is based on limited
experience on original Salora Manager floppy disks, we assume that the included
information applies to both systems to a certain extent.
Note that this is the result of extensive work from members of
the CreatiVEmu forum
and external specialists, to whom we pay our respect. We encourage all
retro computer enthusiasts to join us and make more work on this obscure
machine. Thank you!
2) LOADING FLOPPY DISK IMAGES INTO EMULATOR
At the time of writing this article [September 2023], the creatiVision Emulator (23.09.18)
by Kym Greenshields is the only program able to load images (dumps) of original
Salora Manager floppy disks - in *.dsk format.
To mount an image, launch the emulator with a few parameters as
explained in the emulator manual. One example is: creativision.exe -3 -e discimage.dsk -c casimage.cas
The emulator will start in "Salora Manager" mode with discimage.dsk
preloaded. A cassette image named casimage.cas file is also preloaded
(or created from scratch if not existing) which we can use to save floppy disk
content, if desired (see next chapter of the tutorial).
The emulator screen will display the directory of the discimage.
To load a program from the disk image simply use: LOAD PROGRAMNAME or RUN PROGRAMNAME.
3) SAVING FLOPPY DISK IMAGES TO CASSETTE FILES
If you wish to use one of the programs from a floppy disk on a real machine, but
you don't have access to the Salora Manager Disk Drive and Interface, you may
opt to use the creatiVision Emulator (23.09.18)
to save the program into a cassette audio file. Here's how.
- Start the emulator and preload the disk drive image as explained
in the previous chapter of the tutorial
- Load the program from the *.dsk image => LOAD PROGRAMNAME
- Save to *.cas file => CSAVE "PROGRAMNAME"
- Use the cas2wav.exe tool (also included in the creatiVision Emulator)
to convert the *.cas file to a *.wav audio file
- The file can be then recorded to a cassette tape for use with an actual
Salora Manager computer, or fed into the Salora Manager from the PC via an
audio cable and an audio files player.
4) PROCESS HISTORY (by Thomas Gutmeier)
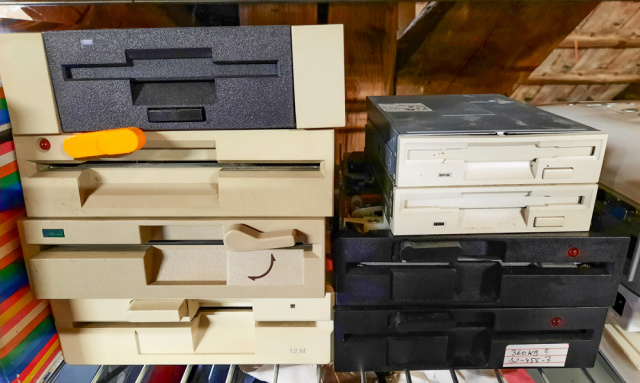
Firstly, big thanks to Luca and Jarkko for lending us their (very rare) discs for this process!
Since the original Salora Manager floppy disk drives and the
disc-controller are extremly rare and at present our Team did not have access
to a working setup who could dump the discs, we needed to take another approach.
Kym Greenshields had already analysed the disc-controllers firmware ROM
and found that the Salora Manager uses a format that is very much like the one
used by Apple II. So we where quite confident that we could use a standard (PC)
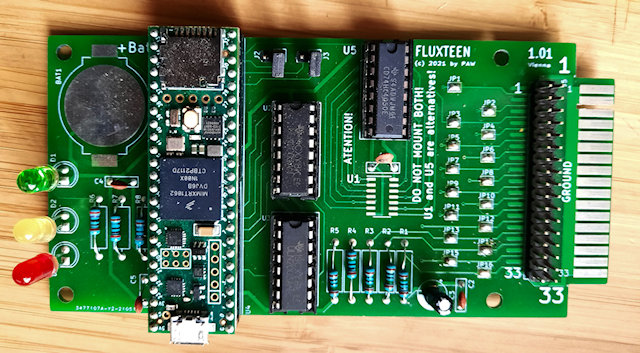
5.25" floppy disk drive and Kryoflux or Fluxteen (see links below) to
read the discs on a low level.
At first i thought that a 360Kb floppy disk drive would be the right
choice, but it was soon clear that a 1.2Mb drive would provide much more "useful"
data. 1.2Mb drives use "narrower" R/W heads whereas the "wider" 360Kb drive heads
read too much "garbage" from the sub-tracks.
I started by using Fluxteen/Fluxcopy to read the discs, convert
the fluxdata (the magnetic changes that store the data on the disc) to the
*.raw format and used the "HxCFloppyEmulator" toolset to have a first
view of the tracks / sectors and data...
Looking at the data, a few BASIC lines and text snippets where
clearly readable, but sadly many sectors showed read-errors...

Over the many read-attempts i used 4 different drives: a few
provided better results, others worse. At times one drive would read one sector
correctly that other drives would fail to read, or vice-versa. Kym did a great
job piecing this big "puzzle of sectors" together and soon he managed to combine
the first complete program! Still a few sectors where missing or were defective
on all our reading attempts. At times, even the sectors that contained the TOC
where defective and information on the sector-order for a given file were missing...
The sector-puzzle got more complicated as now all pieces had the same edges...
Kym was able to extract a few more programs but it was time to
try something different. I borrowed the Kryoflux interface from Guenther, a dear
friend. The main difference between Fluxteen and Kryoflux is in the software:
Kryoflux does not only read on the flux level but lets you specify a format
and directly convert from flux to the desired format during reading of the disc.
That way Kryoflux instantly recognizes if the track 7 sector read
successful, and if not it tries again...
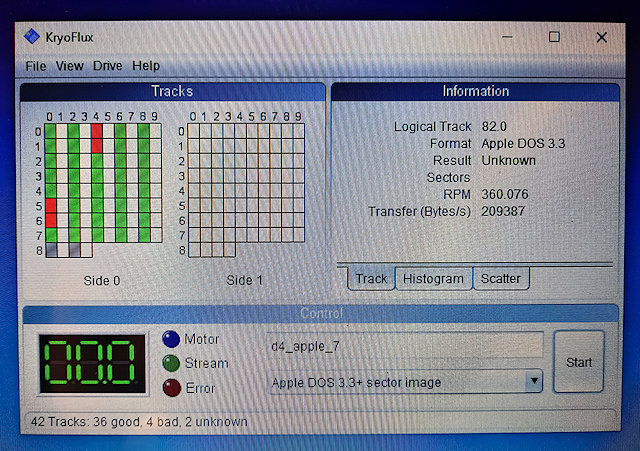
After many retries, the Kryoflux images (still not completely
error-free) provided a few missing pieces for the final puzzle. Combining all the
different sources, Kym managed to reconstruct all programs!
In the meantime, Peter (the Fluxteen/Fluxcopy developer) dove
deep into the raw flux data and found a few "spikes" that looked weird/out of
place to him... He adapted his software to filter the unusual spikes and was
therefore able to interpret a complete disc without errors!
A brand new "Salora Manager" discformat option is now integrated
In the latest build of Fluxcopy :0) Now it should be rather easy to dump
Salora Manager discs that might surface one day!

5) DISC FORMAT, ENCODING AND GEOMETRY (by Kym Greenshields)
The discs are Apple 2 DOS 3.2+ with a different geometry. So same encoding, same
prolog and epilog for payload, same sector sync markers, same track header etc.
Disk structure is 40/35 tracks of 14 sectors. Each track has 128
bytes 0xff header, with 20 bytes 0xff at end of track tail. Each sector has a
standard marker of 0xD5 0xAA 0x96. This is followed by GCR ODD/EVEN encoded pairs
of VolumeID, TrackNumber, SectorNumber and Checksum.
The checksum is simply VolumeID ^ TrackNumber ^ SectorNumber.
The ODD/EVEN encoding is below:
i = VOLUME_ID;
a = ((i & 0xaa) >> 1) | 0xaa;
b = (i | 0xaa);

The end of sector marker is 0xDE 0xAA 0xEB.
The sector header is followed by a further 9 bytes of 0xff.

The payload prologue is 0xD5 0xAA 0xAD, which is immediately followed by 342 bytes of GCR6:2 encoded data and a single byte checksum - which is just the final progression of the encoder.

The payload epilogue is 0xDE 0xAA 0xEB followed by a further 20 bytes of 0xff.

The Volume Table of Contents is always located at Track 17 sector 0.

The sector translation table is

Physical   00 01 02 03 04 05 06 07 08 09 0A 0B 0C 0D
Translated 00 0D 0B 09 07 05 03 01 02 0C 0A 08 06 04

So VTOC contains a pointer to track 17 sector 13 for DIRECTORY. This translates to Track 17 sector 4.

The GCR 6:2 encoder is translated from ROM, hence X,Y :lol:

This is pass one, convert 256 bytes of data to 6:2 cooked encoding.

void DataPreNibble( uint8_t *inbuffer, uint8_t *outbuffer ) {
  uint8_t x,y,c;

  memset(outbuffer, 0, 0x156);

  x = 0;
  y = 2;
  c = 0;

  while (1) {

    y--;
    c = inbuffer[y];

    outbuffer[x + 0x100] <<= 2;
    if (c & 1) outbuffer[x + 0x100] |= 2;
    if (c & 2) outbuffer[x + 0x100] |= 1;
    c >>= 2;
    outbuffer[y] = c;

    x++;

    if (x == 0x56) {
      x = 0;
      if (y == 0) break;
    }
  }

  for(c = 0; c < 0x56; c++)
  outbuffer[c] &= 0x3f;
}

This is pass 2, encode the prenibble buffer to GCR 6:2 encoded output, by using the table lookup from ROM.

/***
 * DataGCR62
 */
void DataGCR62(uint8_t *inbuffer, uint8_t *outbuffer) {
  uint8_t y,c;
  int p,t;

  memset(outbuffer, 0, 0x156);

  y = 0x56;
  p = c = 0;

  /* Save previous buffer byte */
  t = inbuffer[0x100];

  while(y) {

    if ( y != 0x56 ) c = inbuffer[y + 0x100];

    c ^= inbuffer[y + 0xff];
    c = gcr62[c];
    outbuffer[p++] = c;
    y--;

  }

  /* Restore previous buffer byte */
  c = t;

  while (1) {
    c ^= inbuffer[y];
    c = gcr62[c];
    outbuffer[p++] = c;
    c = inbuffer[y];
    y++;
    if (y == 0) break;
  }

  /** Use lookup for checksum byte **/
  c = gcr62[c];
  outbuffer[p++] = c;
}

GCR 6:2 lookup table, same as Apple ][.

#ifndef __GCR62_H__
#define __GCR62_H__

const uint8_t gcr62[64] = {
0x96, 0x97, 0x9a, 0x9b, 0x9d, 0x9e, 0x9f, 0xa6,
0xa7, 0xab, 0xac, 0xad, 0xae, 0xaf, 0xb2, 0xb3,
0xb4, 0xb5, 0xb6, 0xb7, 0xb9, 0xba, 0xbb, 0xbc,
0xbd, 0xbe, 0xbf, 0xcb, 0xcd, 0xce, 0xcf, 0xd3,
0xd6, 0xd7, 0xd9, 0xda, 0xdb, 0xdc, 0xdd, 0xde,
0xdf, 0xe5, 0xe6, 0xe7, 0xe9, 0xea, 0xeb, 0xec,
0xed, 0xee, 0xef, 0xf2, 0xf3, 0xf4, 0xf5, 0xf6,
0xf7, 0xf9, 0xfa, 0xfb, 0xfc, 0xfd, 0xfe, 0xff
};

#endif // __GCR62_H__
Additional notes:
Using tan2.ldo as image
Searching for DEMO^^^^^^^^^^^^^^^^^^^^^^^^^^
File Type : 02
Allocation list T18 S13
Total sectors including SL : 21
Image offset $10000
00: T18 S12 [06 - 10200]
01: T18 S11 [08 - 10400]
02: T18 S10 [10 - 10600]
03: T18 S07 [01 - FD00]
04: T18 S06 [03 - FF00]
05: T18 S05 [05 - 10100]
06: T18 S04 [07 - 10300]
07: T18 S03 [09 - 10500]
08: T18 S02 [11 - 10700]
09: T19 S13 [04 - 10E00]
10: T19 S12 [06 - 11000]
11: T19 S11 [08 - 11200]
12: T19 S10 [10 - 11400]
13: T19 S07 [01 - 10B00]
14: T19 S06 [03 - 10D00]
15: T19 S05 [05 - 10F00]
16: T19 S04 [07 - 11100]
17: T19 S03 [09 - 11300]
18: T19 S02 [11 - 11500]
19: T20 S13 [04 - 11C00]
6) USEFUL LINKS
Fluxcopy / Fluxteen
Kryoflux
HxCFloppyEmulator
7) CREDITS
Thanks very much to Thomas Gutmeier and Kym Greenshields for
doing all the research, testing the process and putting together this wonderful
tutorial! Also thanks to Peter "PAW" and Guenther Pospisil for
assisting Thomas with the dumping procedure.
Thanks very much to Jarkko Pitajamaki for providing a few
rare floppy disks from his collection to allow our Team to dump them.
[Last updated: 18 September 2023]
|
